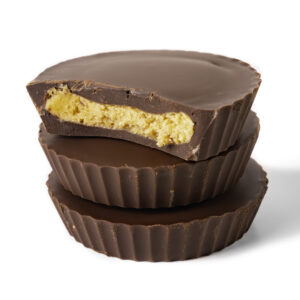
Vegan Reese’s Peanut Butter Cups
These Vegan Reese’s Peanut Butter Cups are super easy and fun to make, and hit all the chocolatey peanut butter notes of the original!

Reese’s were one of my favorite candies growing up. I remember every Halloween, after I went trick or treating, I would dump all my candy out and gather up those little orange squares and make sure I didn’t trade them for anything, they were the gold standard!
Unfortunately Reese’s are another one of those things that unnecessarily have dairy in them, but luckily, they are fairly easy to make at home and are even better if you ask me!
And even though they have recently released some Plant-Based Reese’s, they are hard to find and honestly, I don’t think they’re that good, especially compared to homemade!
why you’ll love vegan reese’s
These are fairly easy to make and hit all the notes that I remember. In fact, my wife says she likes these better than the originals!
Obviously they are great for Halloween, but they are also fantastic any time of year! Speaking of Halloween, I’ve got a few spookier variations to make as well!
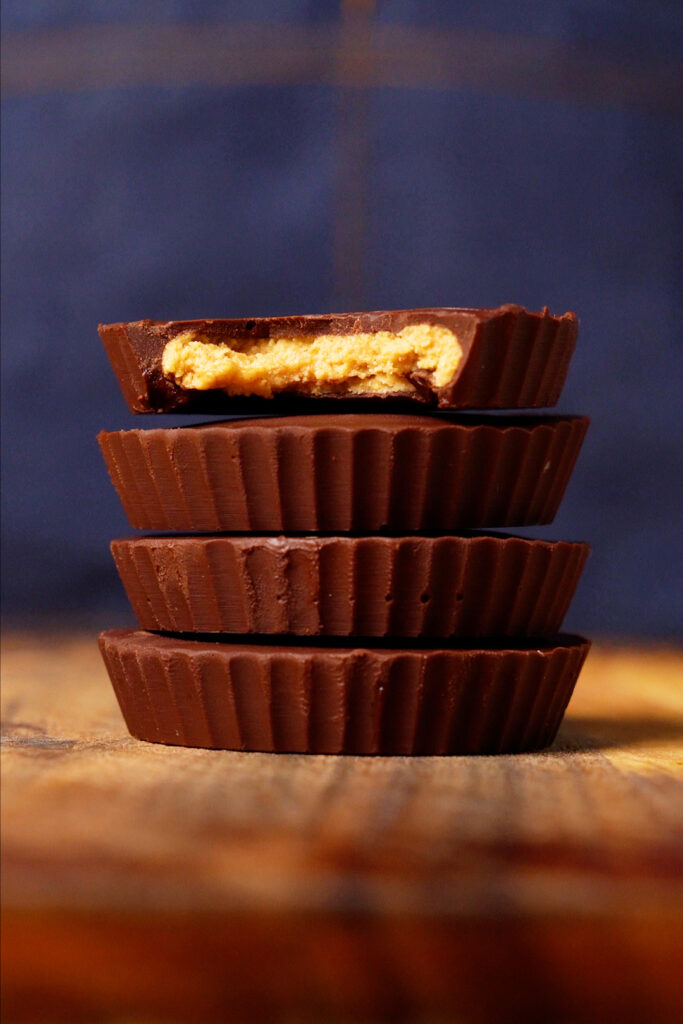
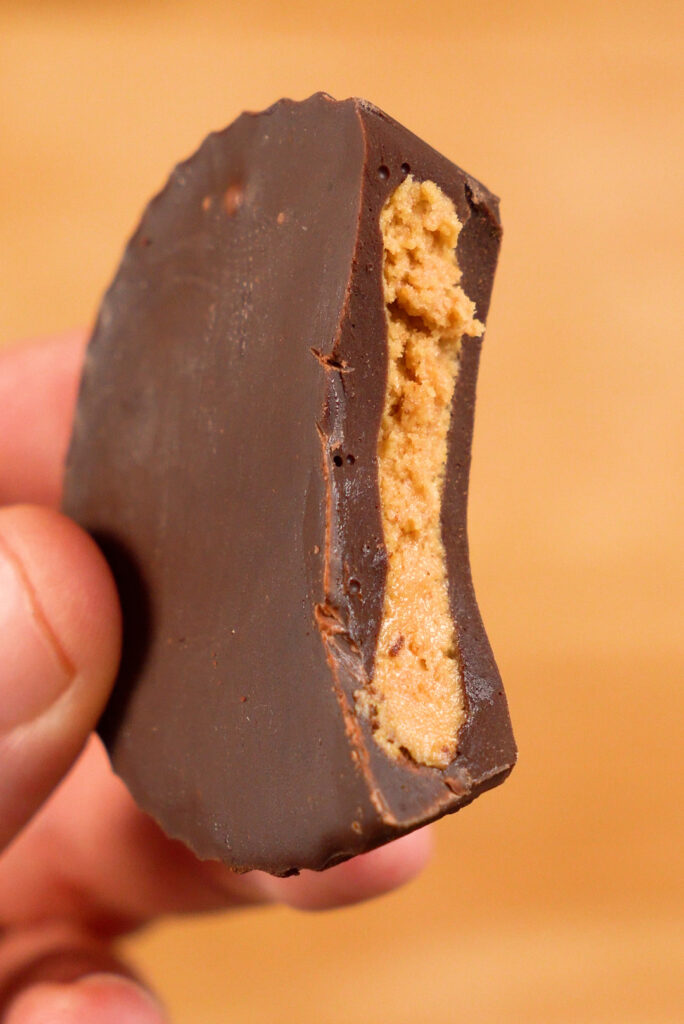
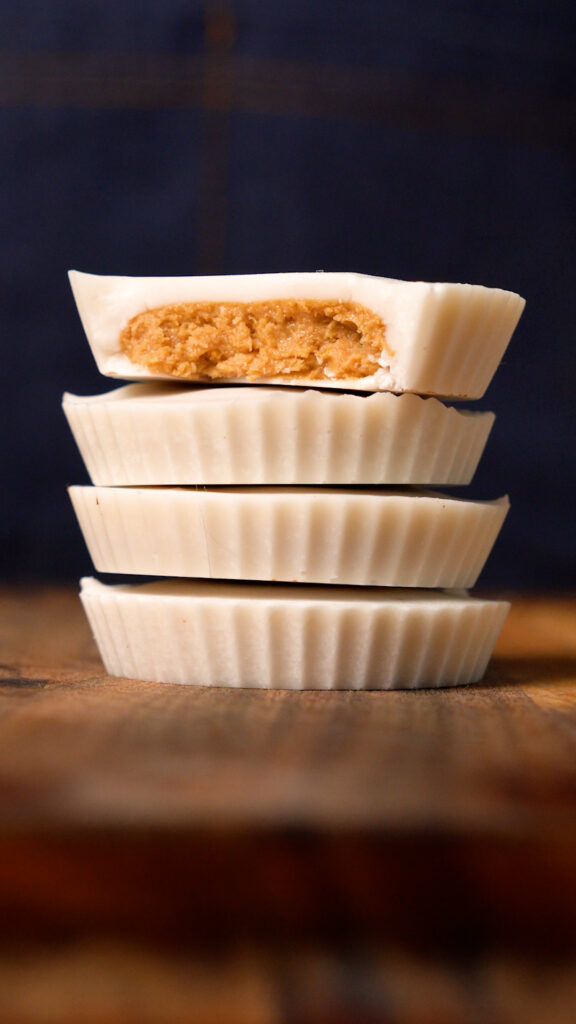
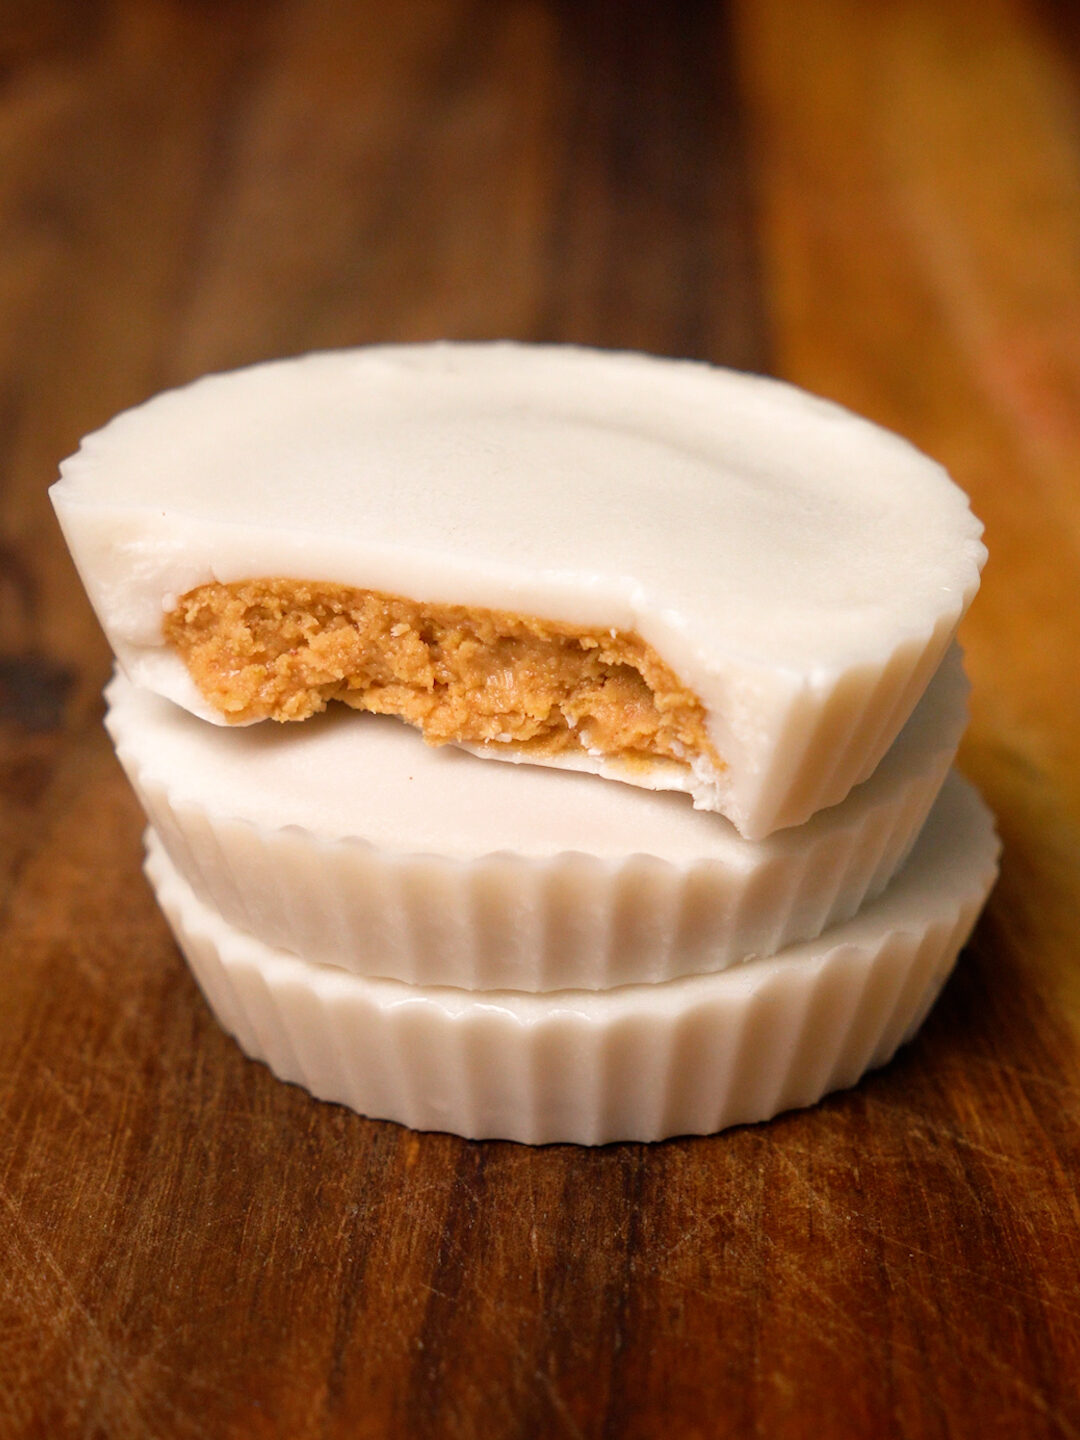
One thing I don’t like about most the store bought vegan peanut butter cups I’ve tried is they have tempered chocolate. This makes them hard and snappy, so when you bite down it squishes the peanut butter filling.
Since we are making these with untempered chocolate, it’ll be nice and soft, and each bite will melt in your mouth as the chocolate and peanut butter become one!

That being said, feel free to store these in the fridge or freezer for a snappier experience!
ingredients for vegan reese’s
There are just a few simple ingredients for Reese’s.
- Semi-Sweet Chocolate
- Peanut Butter
- Powdered Sugar
- Graham Crackers
However, there are a few notes I’d like to go over!

should I temper my chocolate?
I experimented with tempering chocolate and I found that I preferred untempered chocolate for these. Tempered chocolate is too hard and snappy. Texturally, it clashes with the soft peanut butter filling.
Untempered chocolate will be softer at room temperature and more reminiscent of a Reese’s. But feel free to store these in the fridge if you like.
Just make sure to get vegan chocolate, preferably semi-sweet.
what’s the best Peanut Butter for reese’s?
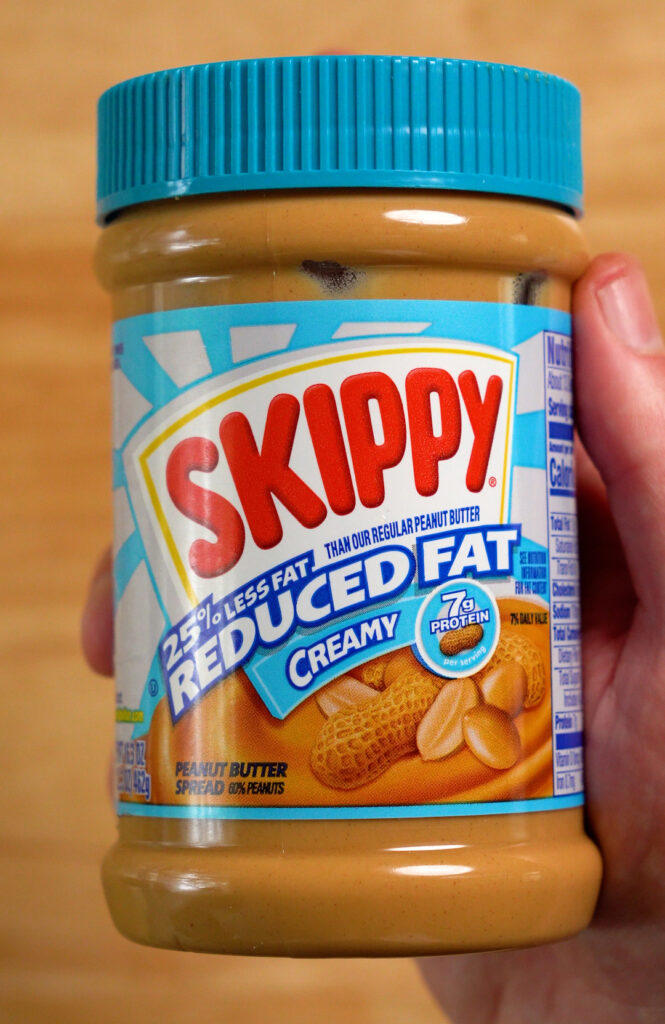
I got a tip from somebody that reduced fat peanut butter gives a better texture and I agree! The Reese’s peanut butter was kinda crumbly and the reduced fat achieves this much better.
I’ve used other reduced fat peanut butters and have found that Skippy is the best at replicating that Reese’s texture.
What do graham crackers do in reese’s?
Adding some graham crackers is optional, but I really like the added texture they impart. It really reminds me of the peanut butter in the original cups, it’s soft, but has a slight little crunch to it.
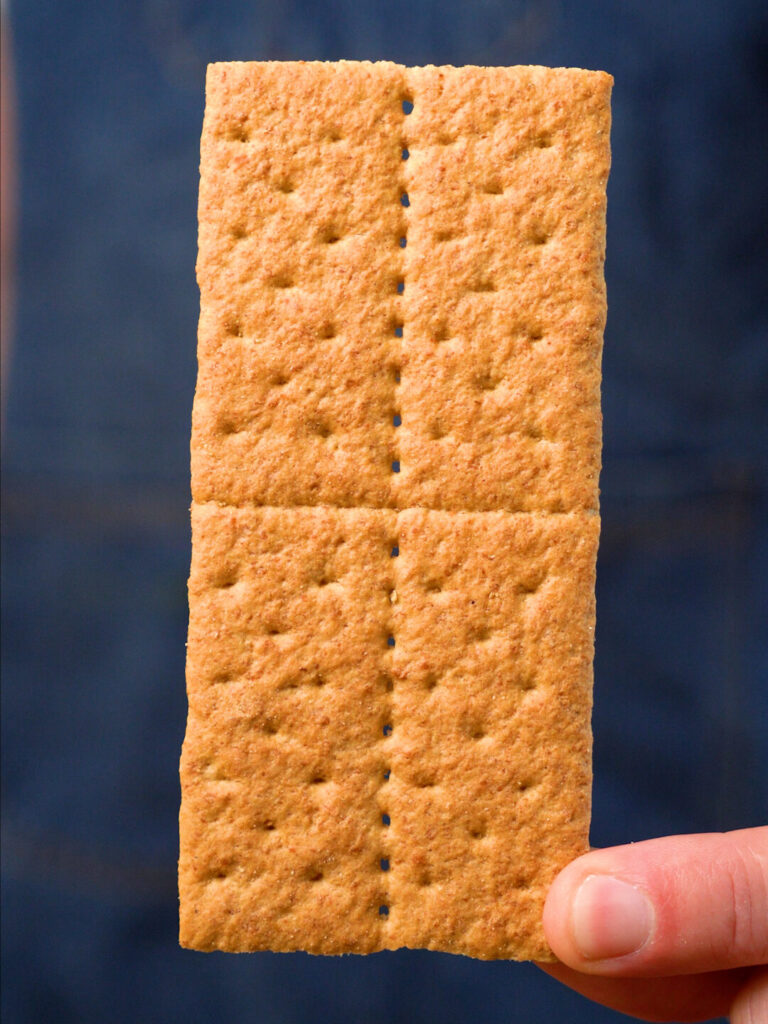
Unfortunately vegan graham crackers are rare since they usually have honey in them. The graham crackers by Nabisco and Kellogg’s are accidentally vegan however, so if you can find them, go for it.
Somebody made this recipe and used Biscoff Cookies instead and I think that would work out well too!
how to make vegan reese’s
First, crush up the graham crackers if you are using them. You’ll want to do this in a food processor to get them as fine as possible.

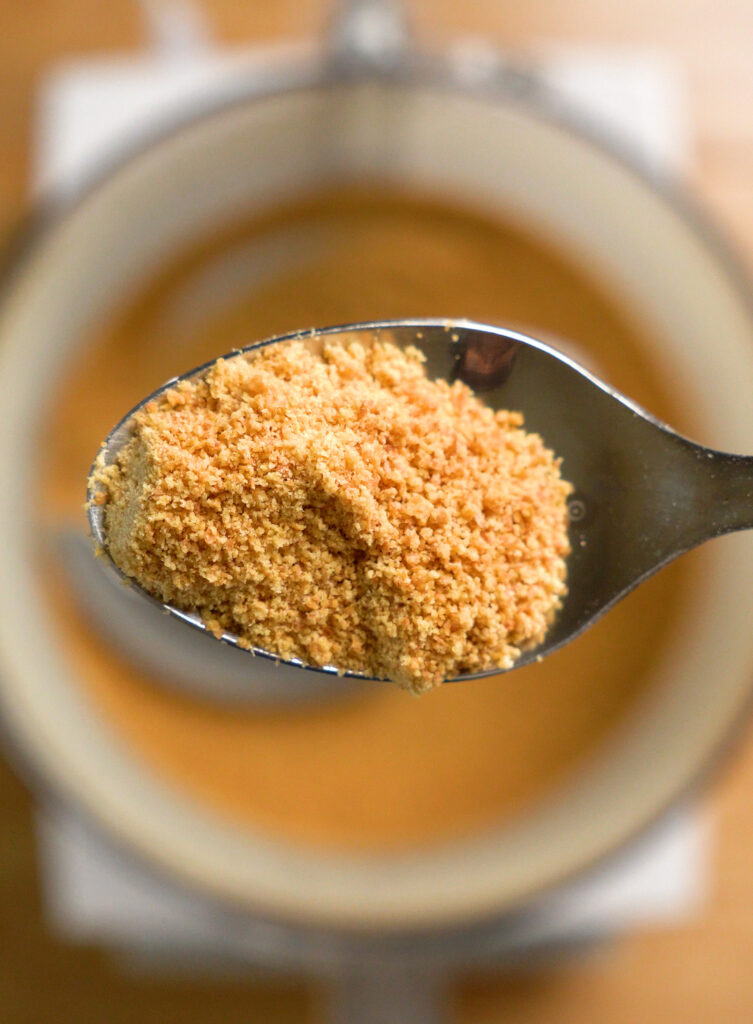
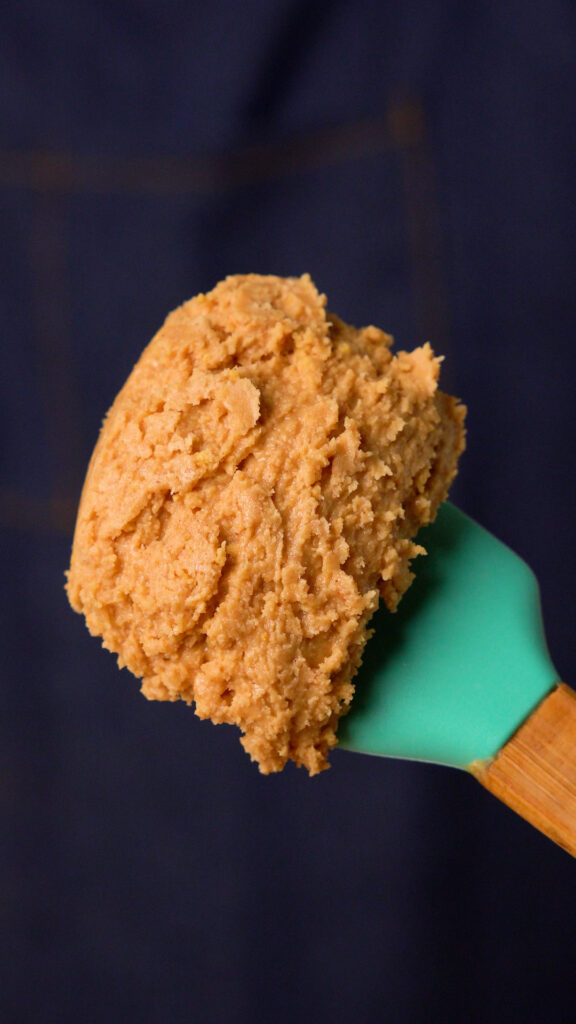
Next, mix the graham crackers, powdered sugar and peanut butter with a hand mixer.
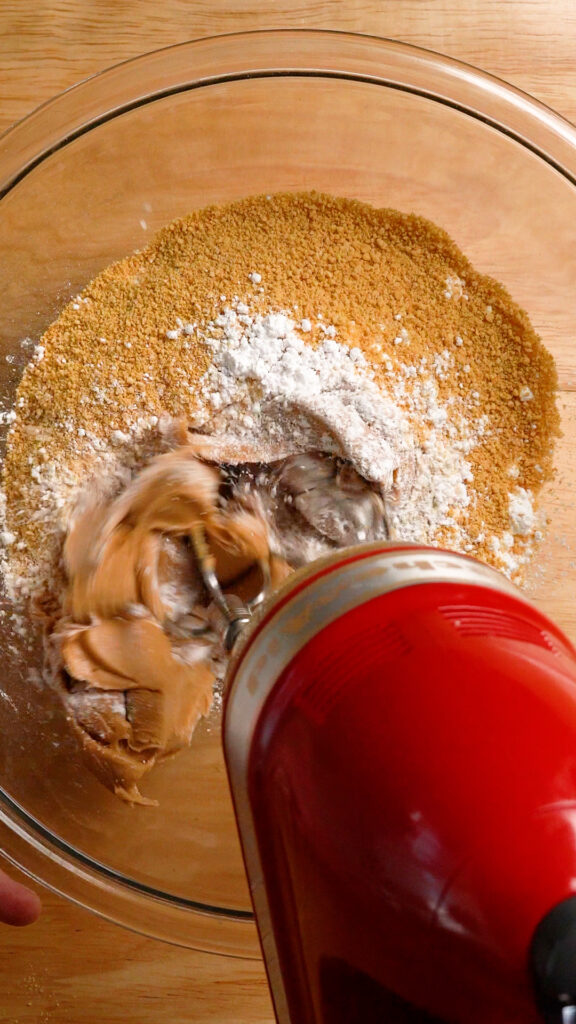
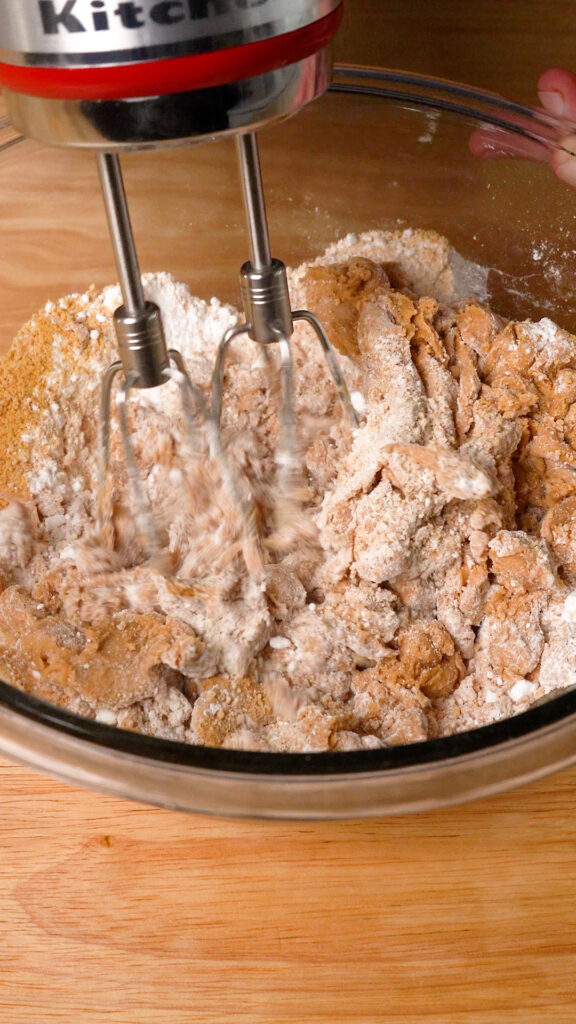

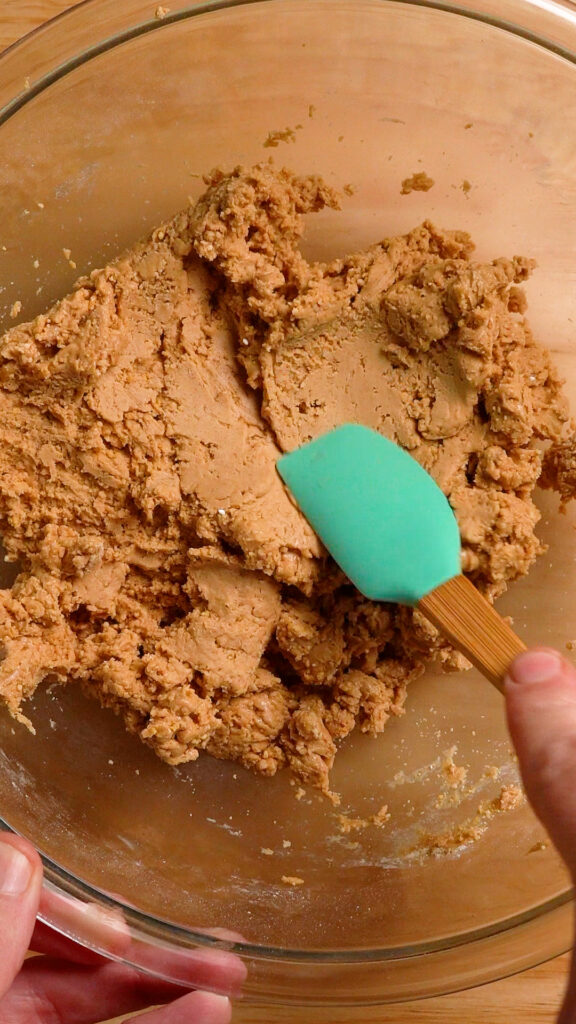
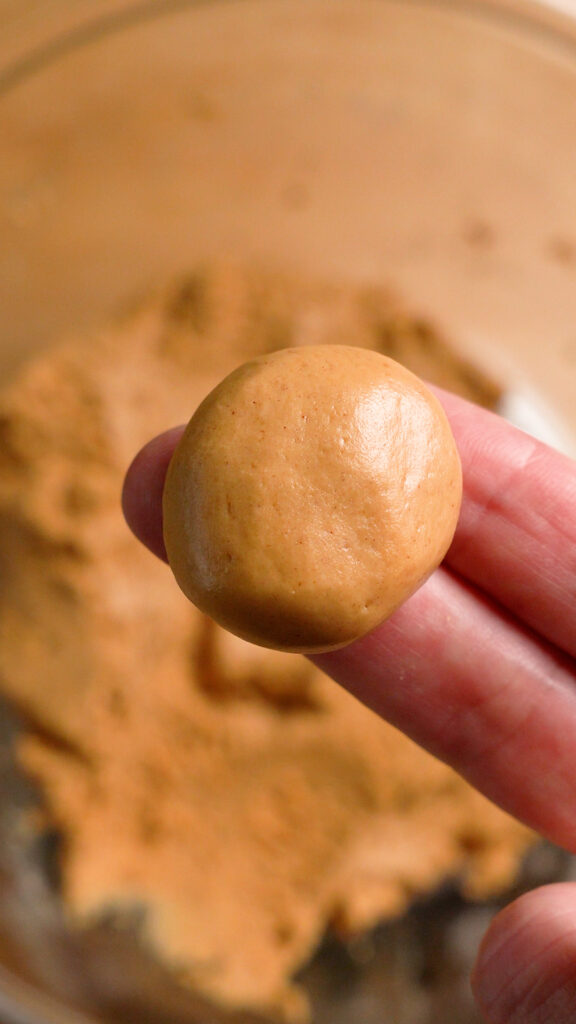
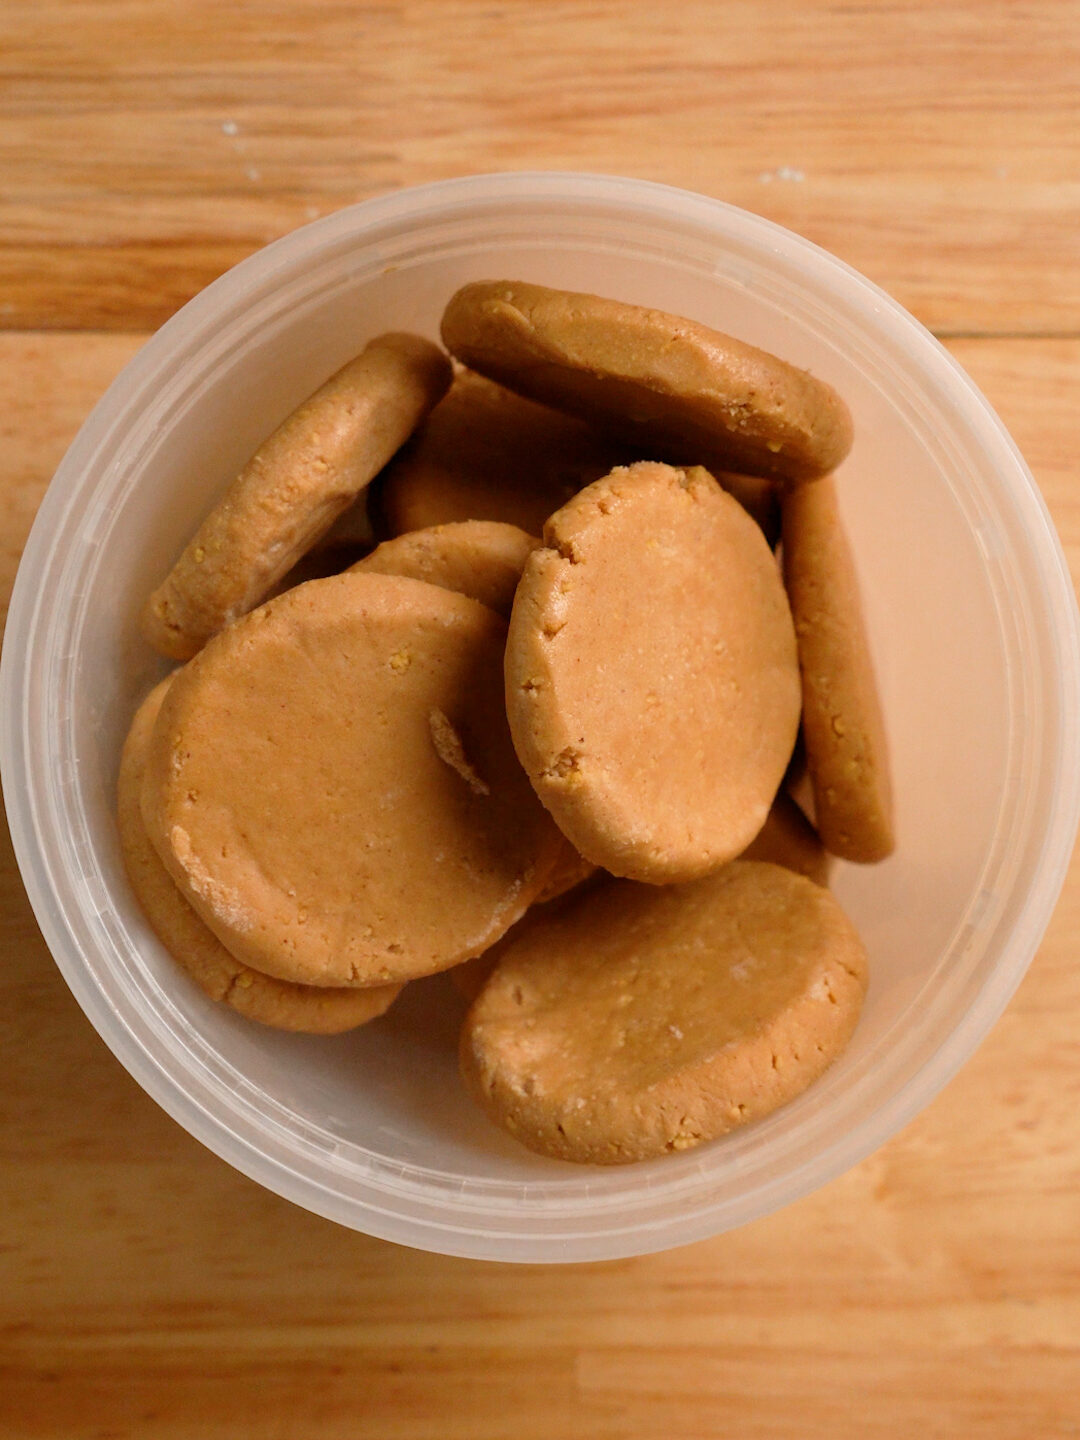
The peanut butter mixture will be dry and crumbly at first, but it should be very easy to work with. Soft but not sticky. Honestly, it should be a lot like Play-Doh! You should be able to roll it into a big ball.
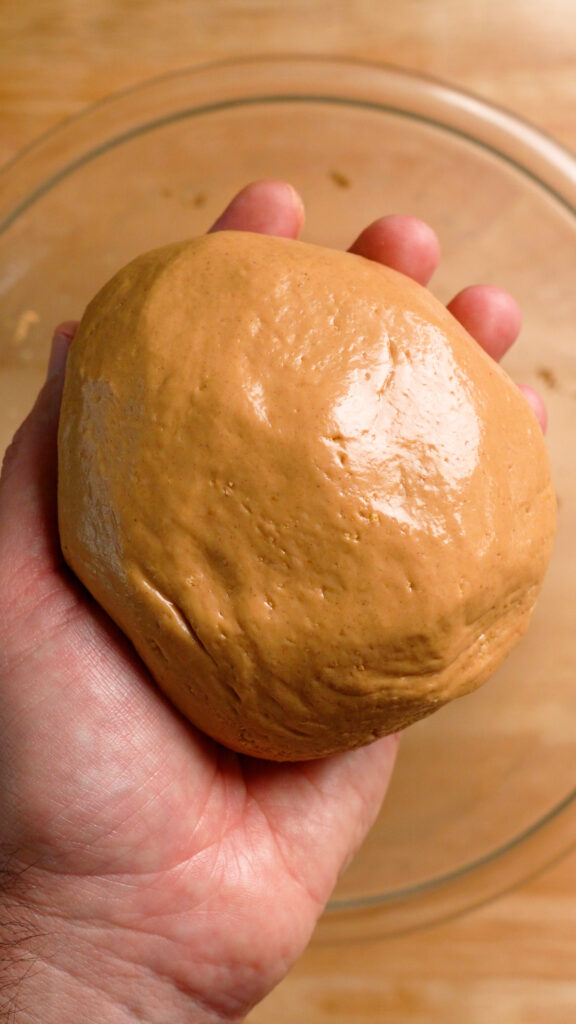
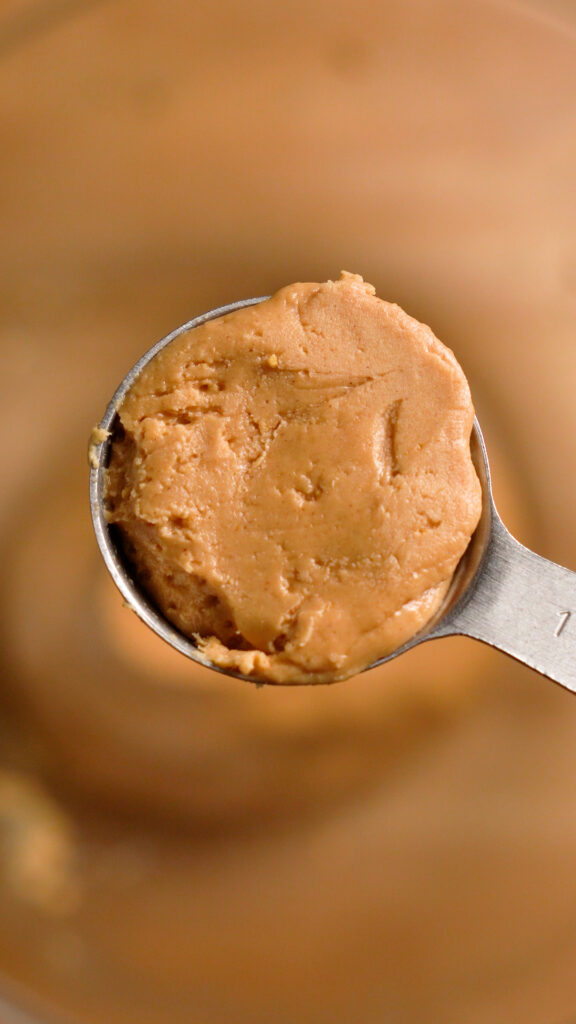
Roll about 1 Tbsp (15 – 18g) worth of the mixture into a ball.
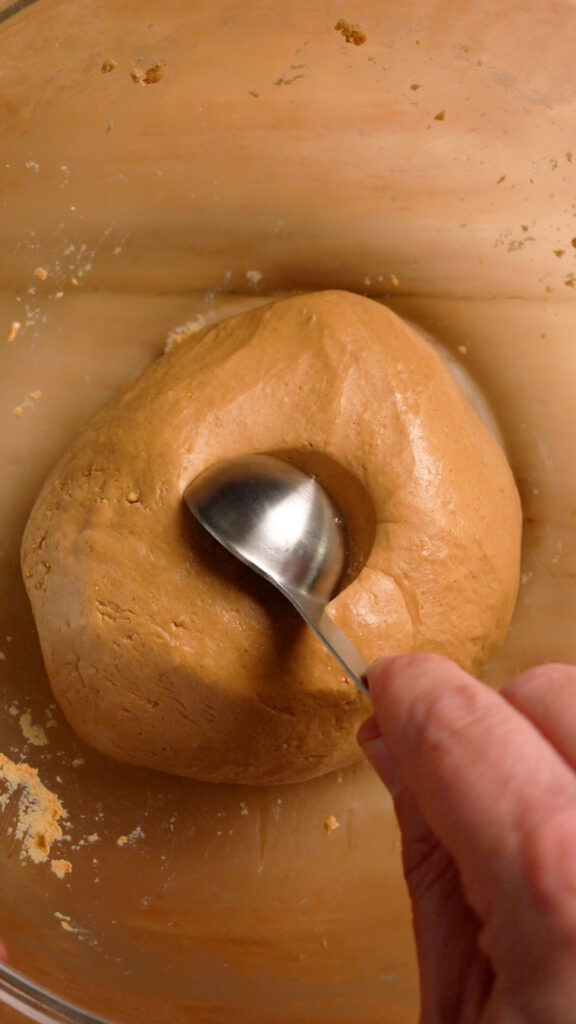
Next, you can simply flatten them into little patties with your hand. But I recommend adding them to a parchment lined baking sheet. Then add a little wax or parchment paper on top.

Then, use something to flatten them (I used a small glass bowl).

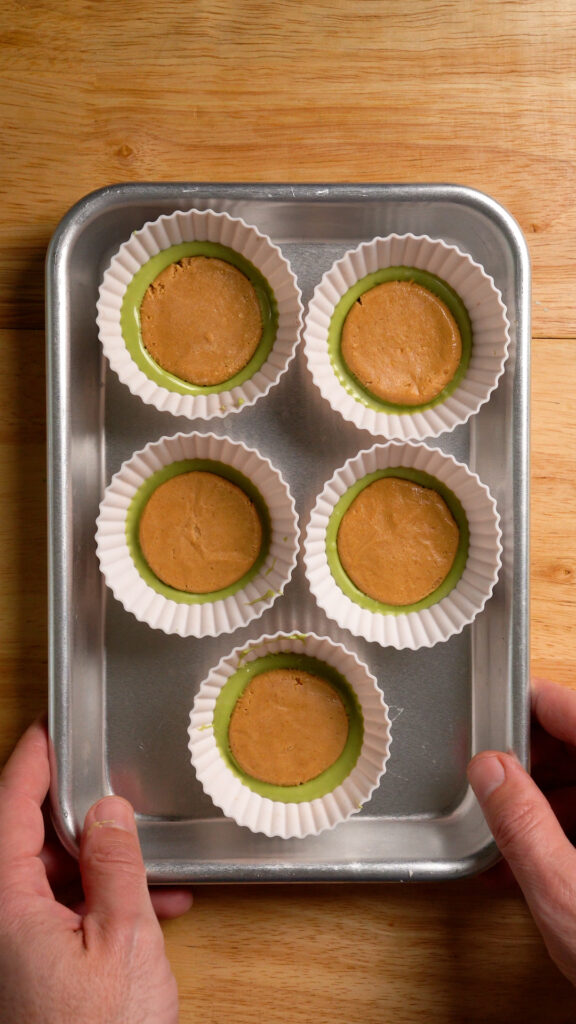
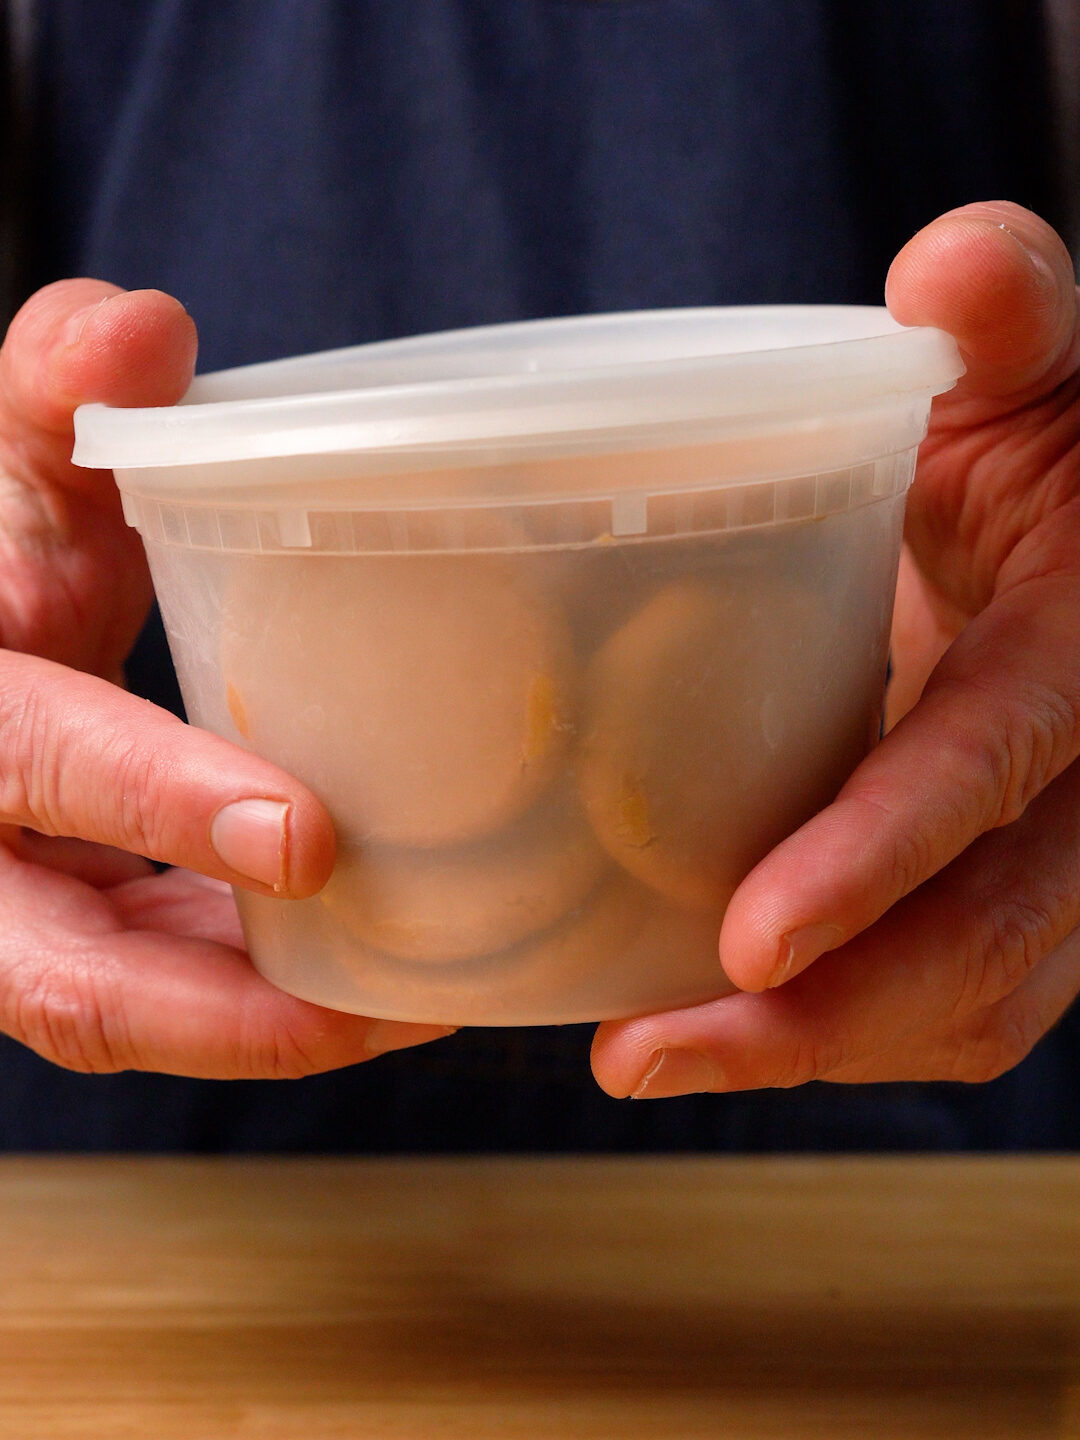
Peel off the wax paper, and now you have a perfect little peanut butter patty! Just make sure that it’s smaller than the mold / muffin liner that you’re gonna use. Once they are all formed, add them to the freezer for about 20 minutes to firm up.

I found that using partially frozen peanut butter patties were a lot easier to work with. Sometimes the melted chocolate was too warm and it would soften the peanut butter and everything got very gooey and hard to work with.
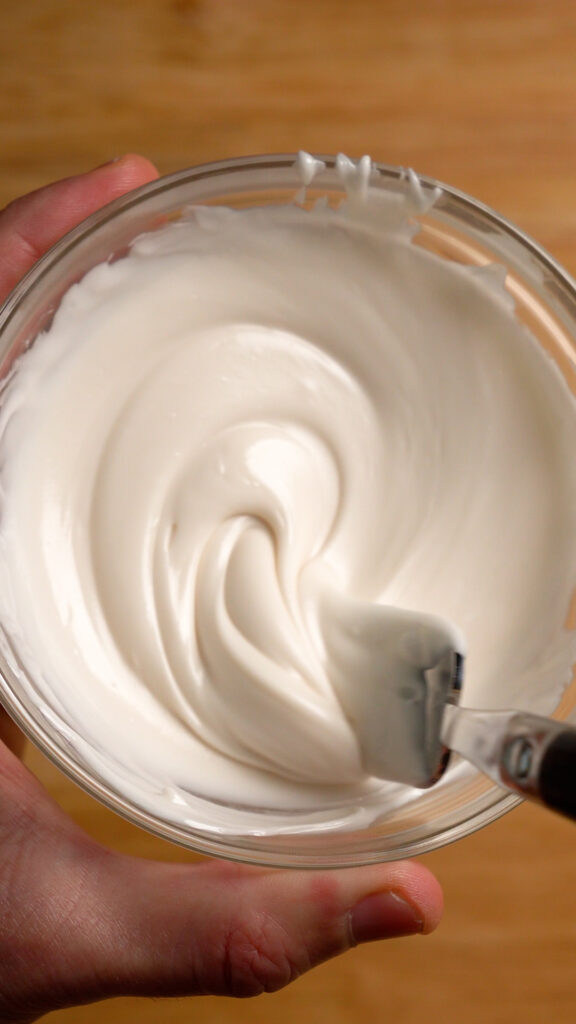
Next melt your chocolate. You can do this two ways. The first is with a double boiler. Which is essentially just getting a large metal or glass bowl and putting it on top of a saucepan filled partially with water over medium heat.
Then you add the chocolate to the bowl. The steam from the water will heat the bowl and slowly melt the chocolate. This is a fine way to do it, but I prefer the microwave!
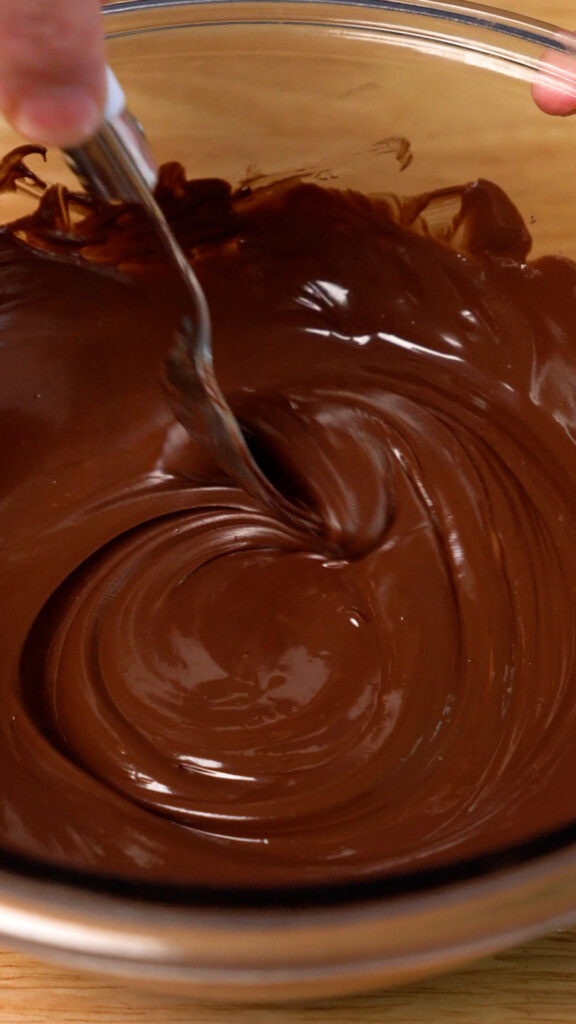
Simply heat the chocolate in 15 – 30 second increments. Stir the chocolate between each 15 – 30 second heating session until it’s mostly melted. When there’s still a few unmelted morsels, just stir and the residual heat will melt them.
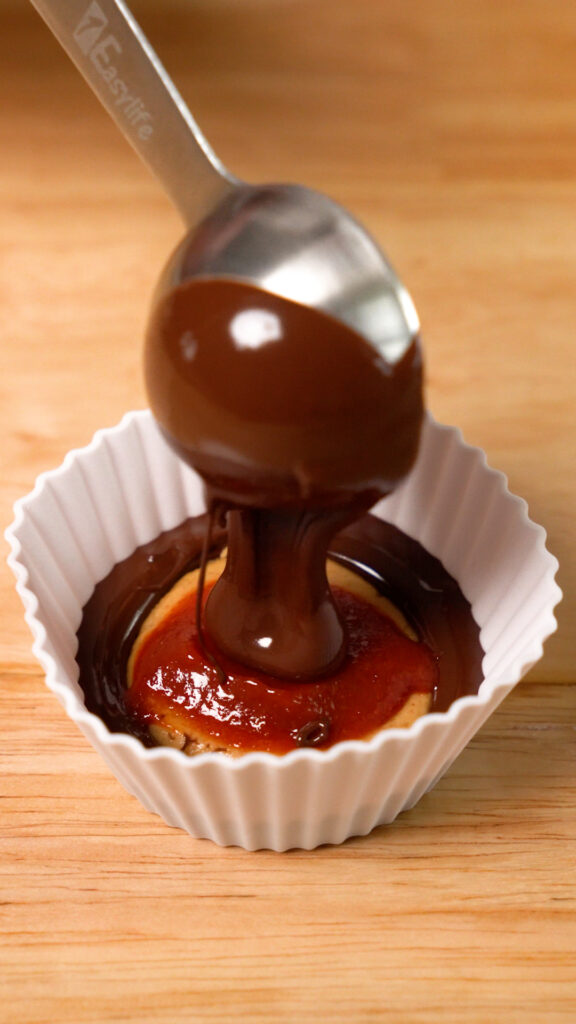
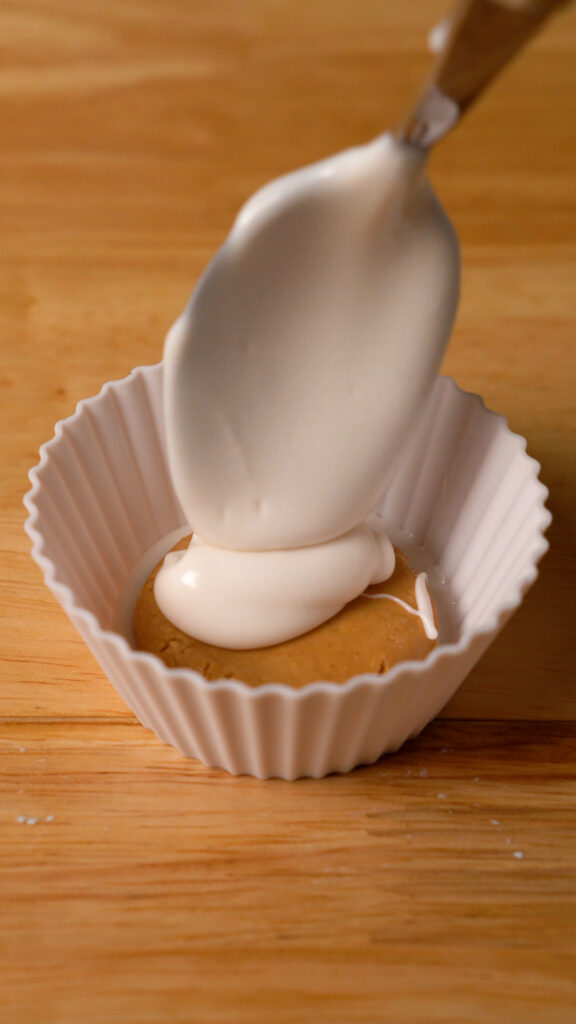
Next we just need to assemble them! First add about 1 Tbsp worth of melted chocolate into a Silicone Mold or muffin liner.

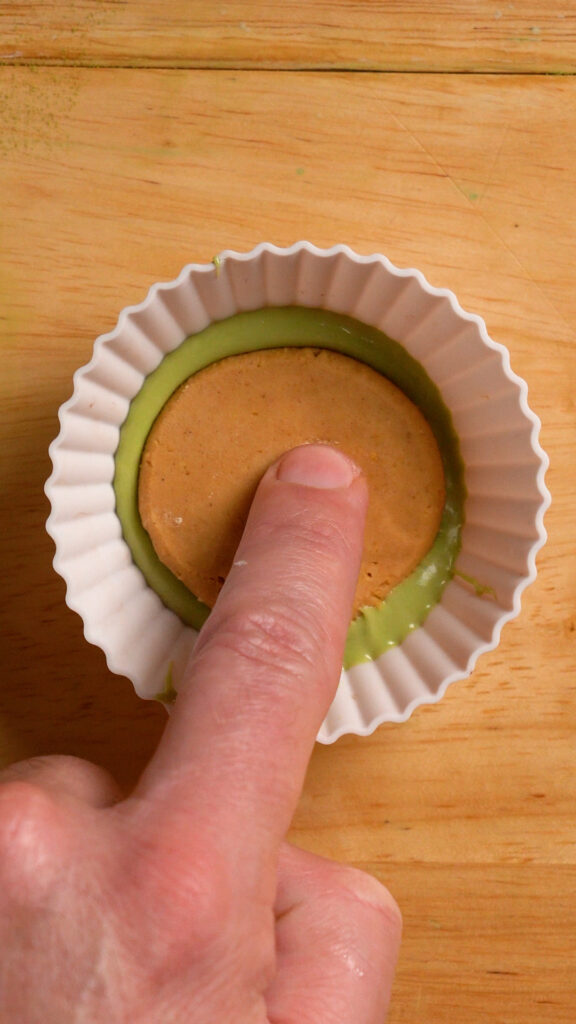
Then add a peanut butter disc, and push it down so that the chocolate engulfs it.

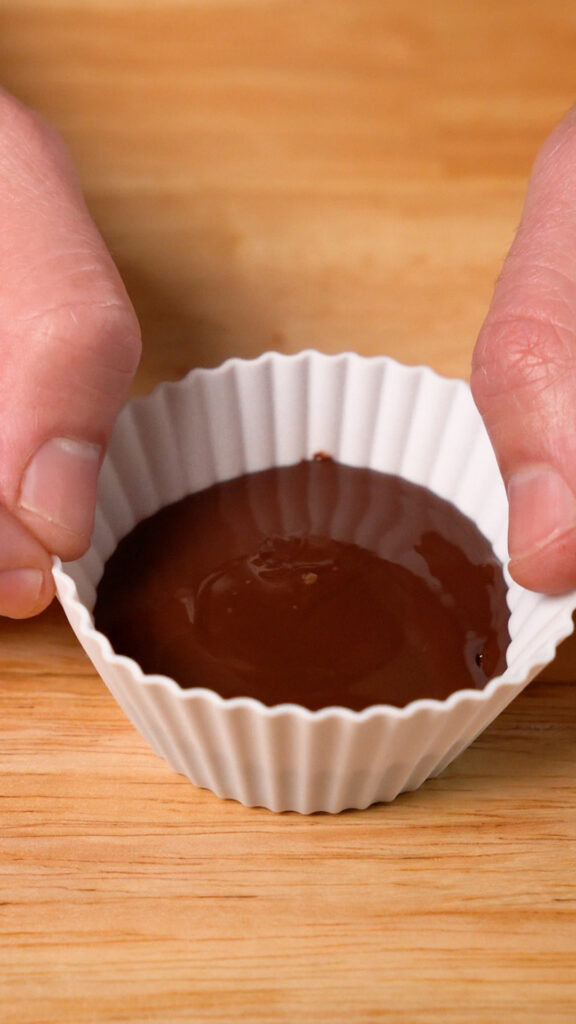
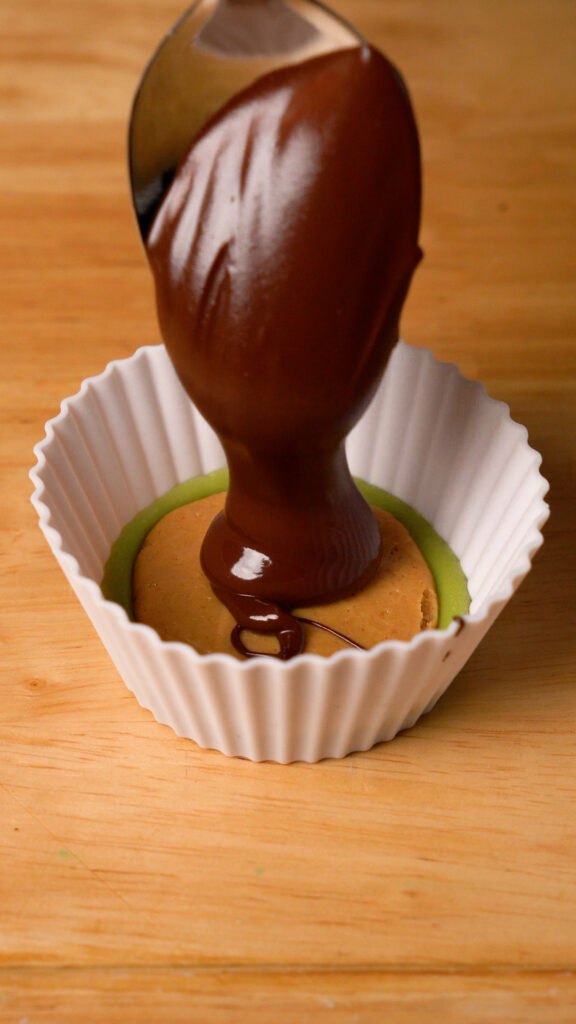
Then add another tablespoon of the chocolate on top. Tap it to flatten the chocolate out.


Then, add that to the fridge for about 15 minutes to set and harden and enjoy!

special equipment needed
- Food Processor – If you are using graham crackers you’ll need to get them ground up as fine as possible!
- Hand Mixer – You could potentially mix the peanut butter and powdered sugar together by hand but it might take a while. A hand mixer comes in handy!
- Silicone Molds – Feel free to use regular muffin liners, but I love how easy and perfect the cups come out with silicone molds.
- Microwave or Double Boiler – To melt the chocolate. I prefer the microwave since it’s easier and faster.
Variations
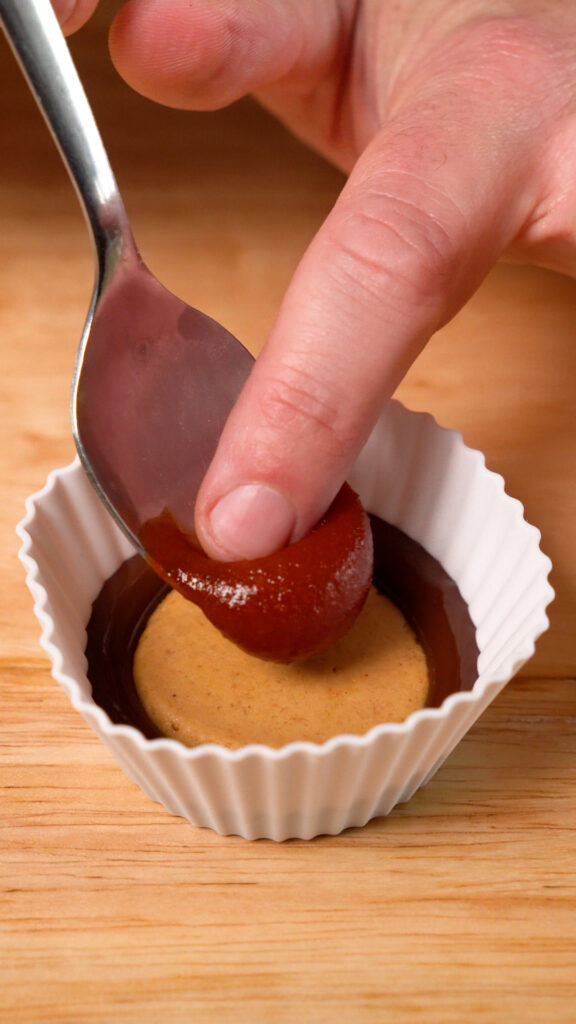
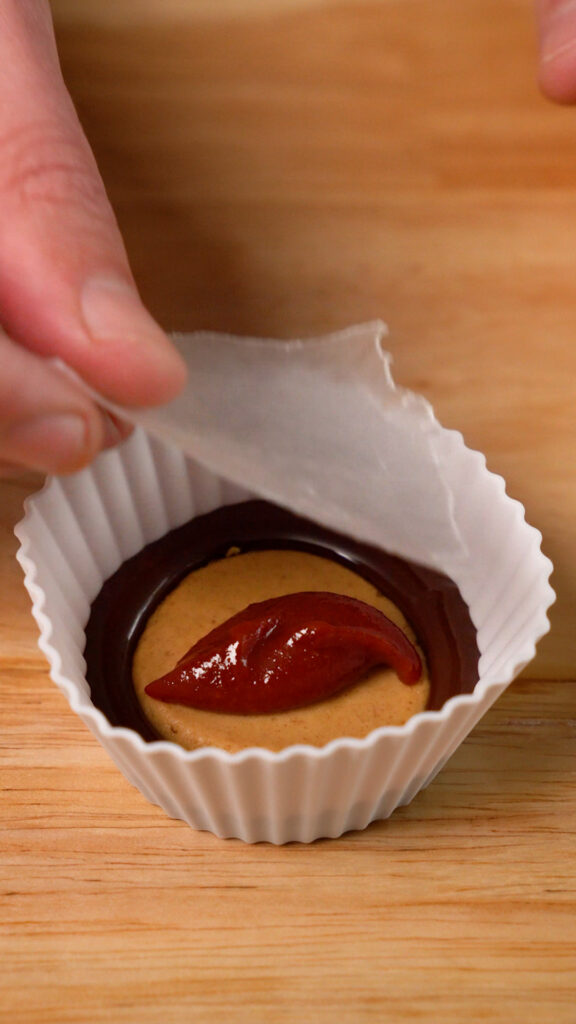
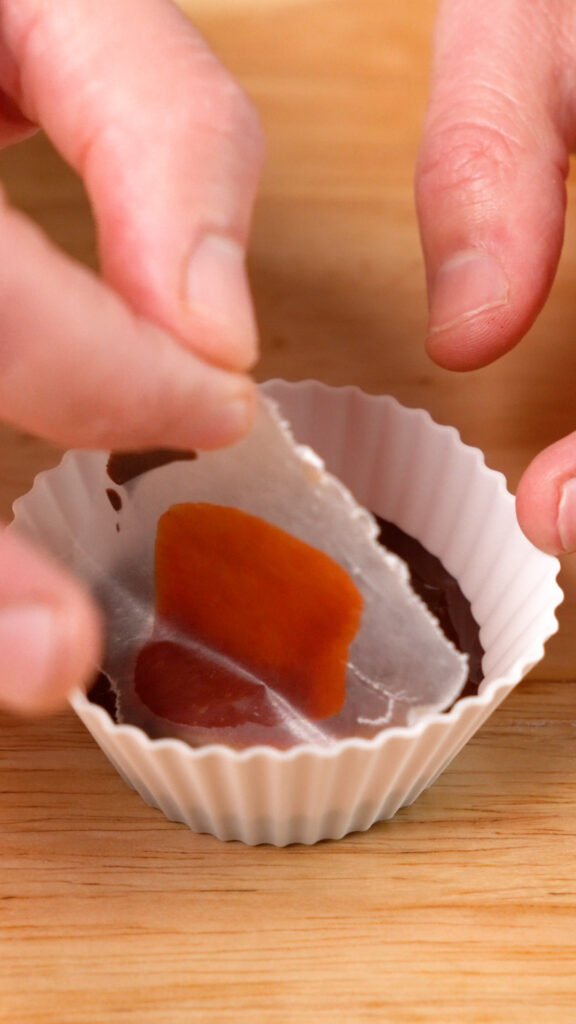
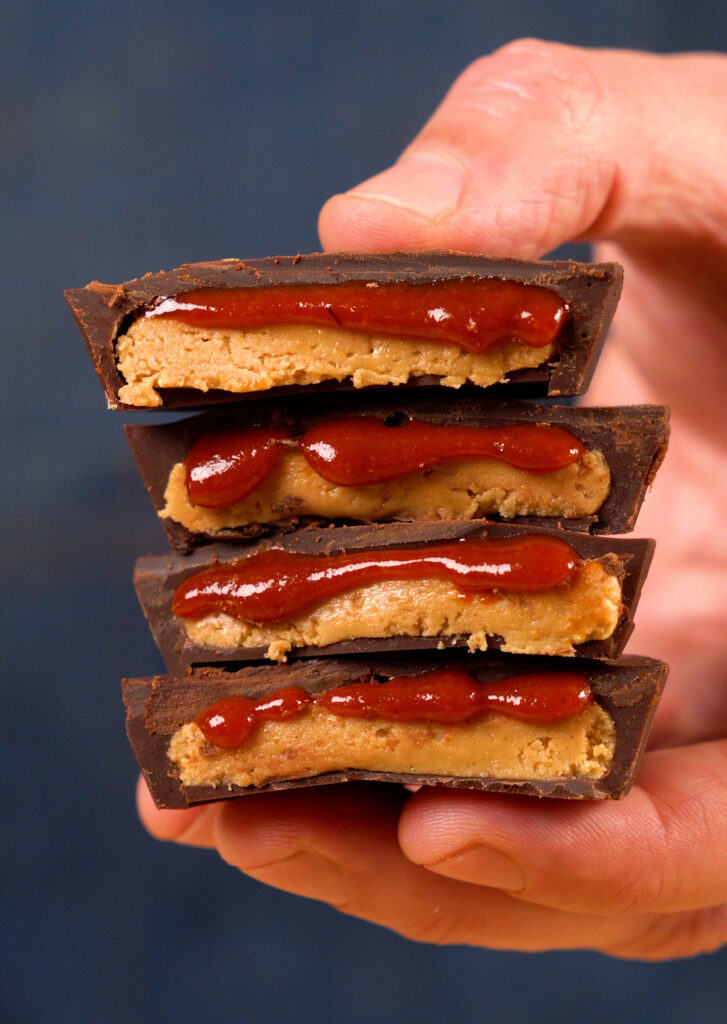
I’ve made a few different variations besides the classic peanut butter cup. My most recent was adding a little bit of gochujang for a spicy peanut butter cup!

All I did for this was add a dollop of some gochujang on top of the peanut butter. Then I used a little wax paper and flattened it out by lightly pressing it. I found that spreading it with a spoon or knife was too messy. Then I just topped it with more chocolate!
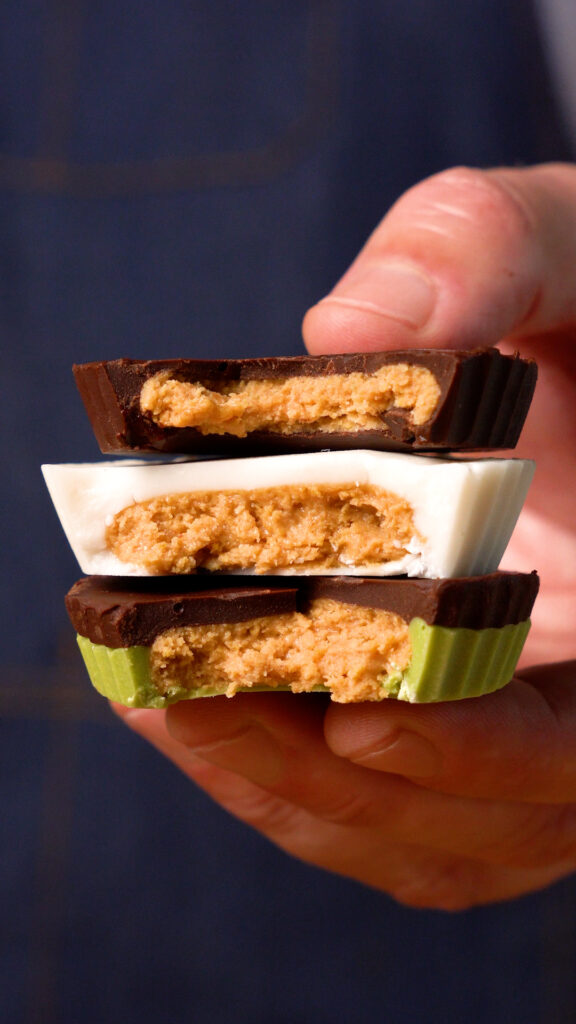
“Ghost” Reese’s Peanut Butter Cups
The Ghost variation just swaps the chocolate for White Chocolate. I’ve used the white chocolate chips by Enjoy Life. You can also make some at home, I’ve used the recipe by Nora Cooks for that!

Frankenstein Reese’s Peanut Butter Cups!
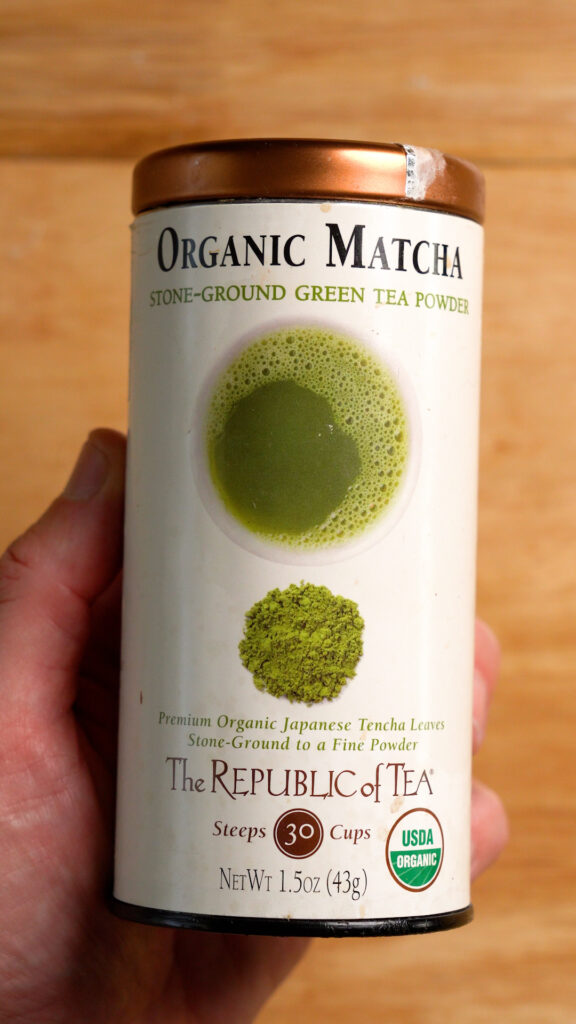
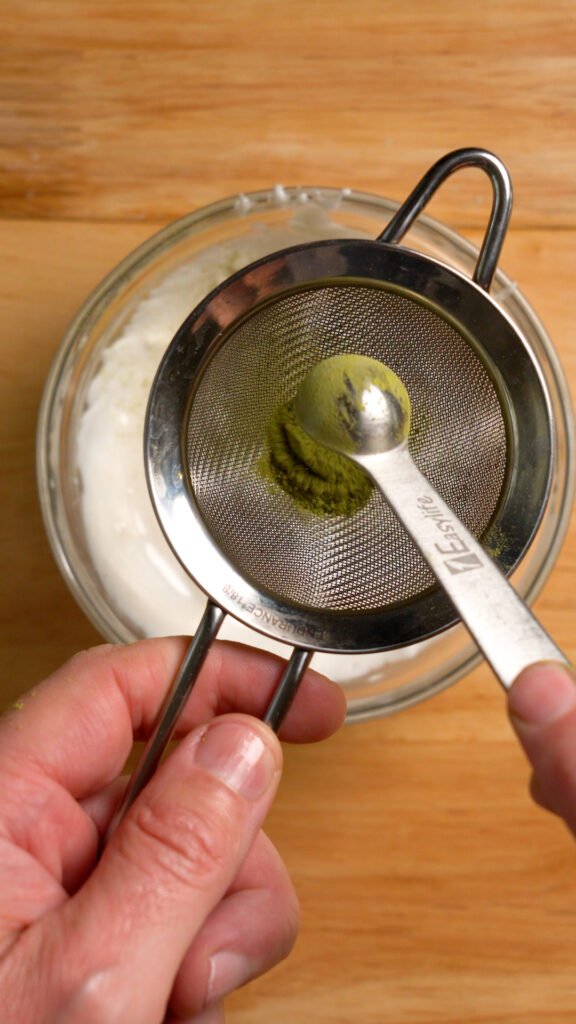
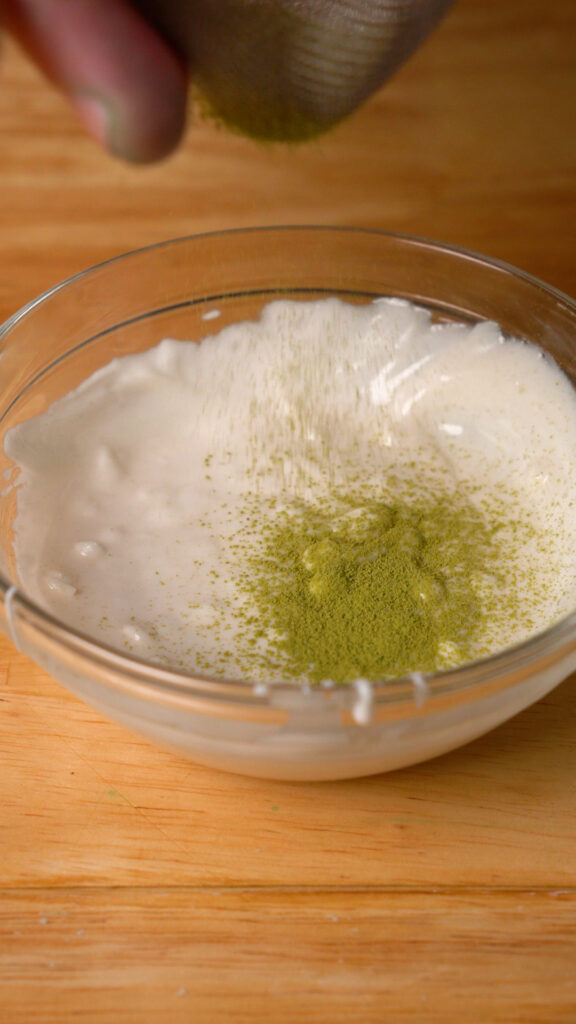
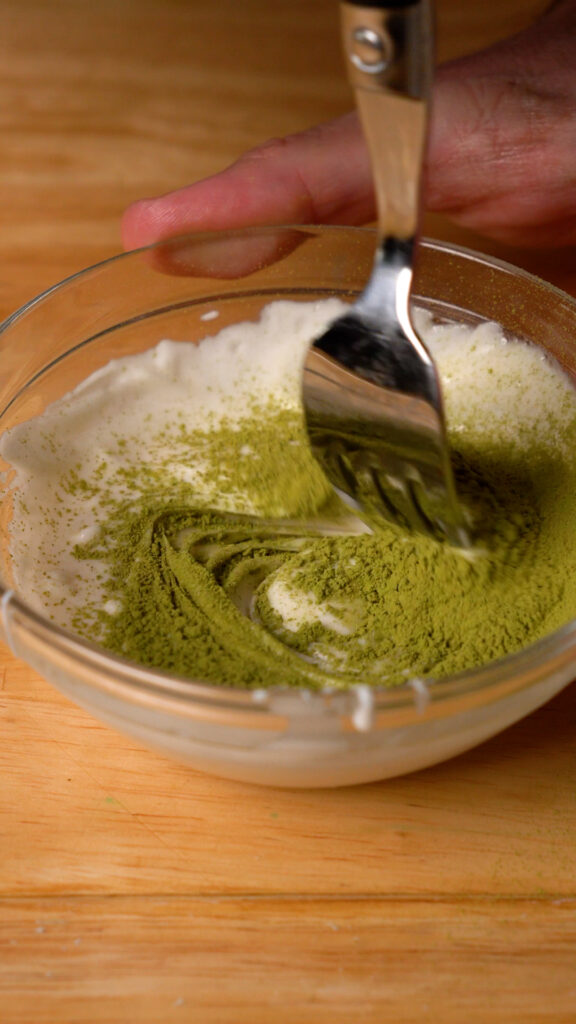
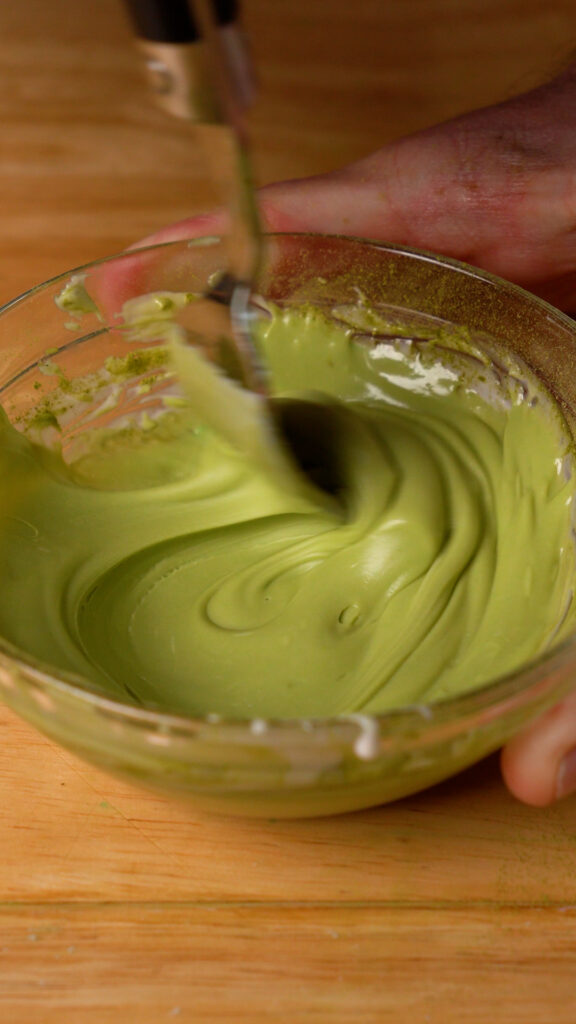
The Frankenstein variety was maybe my favorite! For that I just added a little Matcha powder to the white chocolate to make the green chocolate, super good!
FYI I don’t recommend using water based food dye as it will cause the chocolate to seize up!
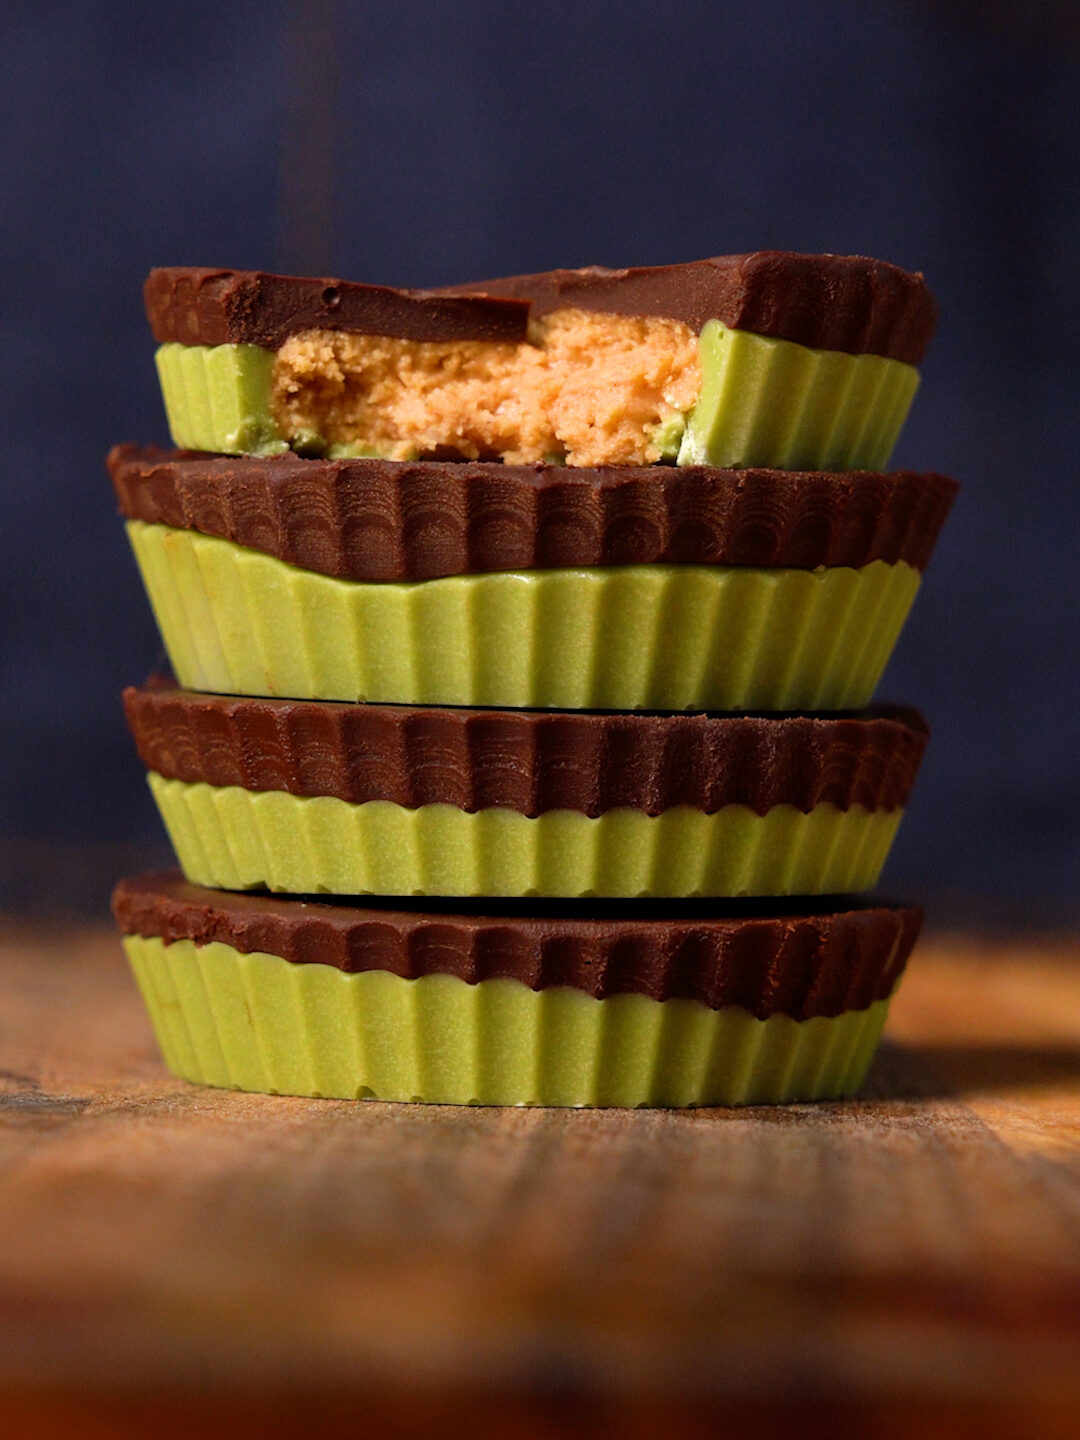
For the Frankenstein, you’ll need to let the green chocolate set in the fridge before adding the chocolate layer as it’s basically liquid and the chocolate will just seep into it. But it only takes about 15 minutes for it to set!
handy dandy (older) VIDEO HERE!
Storage
Store in the fridge, or at room temp and eat within 3-5 days (they never last that long in my house!) You can also freeze them so they’ll last even longer.
Storing them at room temp will give you a softer chocolate experience, just like a real Reese’s. If you store them in the fridge or freezer they will be firmer and snappier.
Also, if you store at room temp, I suggest keeping them on parchment paper (or something non-stick) so they don’t stick to the plate / tupperware that you’re using.
freezer friendly reese’s peanut butter cups!
If you don’t want to make all of the Reese’s at the same time, you can simply flash freeze the peanut butter patties for 30 minutes. Then add them to a freezer safe container and then you can just melt a little chocolate and make 1 – 2 Reese’s cups whenever you get a hankering!
tips for vegan reese’s
- Use graham crackers (or Biscoff cookies) for better texture.
- Reduced fat Skippy Peanut Butter also lends to a better texture.
- Don’t temper your chocolate.
- Use some wax paper and something flat to form the peanut butter patties.
- Freeze the peanut butter patties so they are easier to work with.

commonly asked questions about vegan reese’s
- Can I use other nut butters, or sunbutter? Yes! It might not be as crumbly but still good!
- Is chocolate vegan? As long as it’s not milk chocolate it is usually vegan. You can find dark chocolate or semi-sweet chocolate chips that are vegan.
- Do I need to use graham crackers? No! They are optional, but I do like the added texture they provide. You can also try using Biscoff Cookies!
- Which graham crackers are vegan? The only ones I’ve found are the Nabisco and Kellogg’s crackers. They don’t have honey in them. But again, they are optional so don’t worry about it if you can’t find any.
Other sweet treats!
Recommendations for Kitchen Gear, Spices & Pantry Items, check out my AMAZON Storefront!
Vegan Reese’s Peanut Butter Cups
Ingredients
- 20 oz. Semi-Sweet Chocolate (Vegan)
- 12 oz. Peanut Butter (ideally reduced fat Skippy)
- 3/4 cup Powdered Sugar (more if needed)
- 1/4 cup Crushed Graham Crackers or Biscoff Cookies (optional)
Instructions
Peanut Butter Patties
- In a food processor, crush the graham crackers (you should need about 3 of the full rectangular crackers) until they are a fine dust.
- Combine peanut butter, powdered sugar and graham crackers (if using) using a hand mixer. The mixture should be soft but not sticky. A lot like Play-Doh! As long as you can easily roll it into a ball and it doesn't fall apart. If it's to crumbly, add more peanut butter. If it's too soft and sticky, add more powdered sugar.
- Use a tablespoon to scoop out some of the peanut butter mixture (about 15 – 18g worth). Roll it into a ball, and then flatten it into a patty that's slightly smaller than the bottom of your muffin liner. You can do this by hand, or you can add the ball to a parchment lined baking sheet. Then top it with a small piece of wax or parchment paper and press down with something flat and hard (I used a small glass bowl).
- Once all patties have been formed, add them to the freezer to firm up for about 20 minutes.
Melting the Chocolate
- To melt your chocolate you have two options. Use a double boiler, or get a saucepan and fill it with a couple inches of water. Next place a heat proof bowl on top of the saucepan, making sure the bottom of the bowl isn't touching the water.Add in the chocolate and then place on a stovetop over medium heat. Once the water begins to steam, whisk the chocolate until it melts. Once it's 90% melted, remove from the heat and continue whisking until it's totally melted.
- Alternatively the second method, which is much easier and faster (and my preferred way) you can simply microwave the chocolate in 15 – 30 second increments, stirring in between. Once it's 90% melted, stir and let the residual heat melt the rest.
- Drop in about a tablespoon of melted chocolate into a muffin liner. Place a peanut butter patty on top, and press down to ensure there's chocolate surrounding it. Then cover the patty with about 2-3 tsp of chocolate until it's totally covered. You can lightly tap the liner on the countertop to flatten out the chocolate.
- Once they are all done, add them to the fridge to firm up for about 15 – 20 minutes.
- ENJOY!
Freezer Friendly Option
- Something I've been doing recently is making all the peanut butter patties, flash freezing for 20 minutes, and then adding them to a freezer safe container. Then whenever I have a craving for a Reese's, I'll melt a little chocolate (you'll need about 1 oz. of chocolate per Reese's cup) and just make 1 or 2 at a time! So if you don't want to make 24 Reese's at once, you can do that too!
Notes
Storage
- Store in the fridge, or at room temp and eat within 3-5 days (they never last that long in my house!) You can also freeze them so they'll last even longer.
- Storing them at room temp will give you a softer chocolate experience, just like a real Reese's. If you store them in the fridge or freezer they will be firmer and snappier.
- Also, if you store at room temp, I suggest keeping them on parchment paper (or something non-stick) so they don't stick to the plate / tupperware that you're using.


Do you think this would work with sunbutter?
I don’t see why not! Go fo it!
This was the perfect Reese’s copycat for me to treat myself this halloween. Use some good chocolate, and it’s even better than I remember, but with Reese’s peanut butter! Thanks!
Nice, so glad to hear that! Thank you!
Wow! The graham cracker crumbs as that gritty texture was GENIUS. I made these for my husband and I and we ate them so fast that I’m making another round tonight. Thank you so much for making a recipe that perfectly satisfied our childhood cravings!
Haha I know the feeling! Glad you both liked em!
Would I be able to use a natural peanut butter for this recipe or would I need to use a processed one like Jif or Skippy?
You can but the texture will likely be softer / not as crumbly like Reese’s. You could try adding more powdered sugar or cracker crumbs to dry it out more though too.
Could I use Splenda instead of powdered sugar?
I’m not sure if that would work, especially if it’s not in powdered form, but you can test it out!
Do you think I could use carob chips? Want to mane these for my mom, bit she has to eliminate all caffeine, so chocolate is a no-go.
Hi, I’m not sure as I’ve never worked with them! Sorry I can’t say one way or the other.
I used regular jiff since I had that on hand. I ended up having to add so much extra sugar and crackers and still very sticky. Does the reduced fat help that?
Yes, but even still you shouldn’t need to add that much more! You used powdered sugar? I’ll have to test it again with regular fat peanut butter but I don’t remember it being that big of an issue, sorry about that!